Teaching students from programs such as Digital Photography, Graphic Design, 3D Game Design, Film-making, and 3D Modeling & Animation, have forced me to create nearly one hundred different workshops with this software.
Here's one of the many special effects tutorials I constructed, it's all about creating a simple mystical-swirly-line-style effect. So let's begin...
Below is the final product you'll be creating (or something similar), add your own colors and line patterns in any way you see fit as you move through the instructions.
Let's start by downloading this Desert Dancer photo.
I got this photo from one of hundreds of free hi-res stock photo archives from Deviant Art.
STEP 1
It helps to have a darker image to work with, it will help to bring out the lighting effects even more.
Go to Image > Adjustments > Levels
and bring the middle level to the right a bit, just to darken the image.
STEP 2
First, make a new Layer, and select this new layer.
Then go to the Paths tab and create a new path.
Zoom in on the area you want to start.
Press "P" on the keyboard to activate the Pen tool.
STEP 3
Try to visualize where the fire line will go on the character. Keep in mind dimension and action, swirling motions do wonders.
Click on the image to start your path.
Click your next point, hold the button down, and drag to create a bendable spline path. Continue doing this, following the idea of where you want the energy swirls to go.
Keep in mind where you want the curved lines to go, draw through the body even the areas that would be going behind the body parts, we'll fix this later. For now shape your lines as they go over and under the areas you'd like the lines to flow through.
Eventually you get something like this. Do whatever wild and crazy wizard energy lines you wish to do.
Remember, you'll only see about half of these lines once you're done because the other half will be hidden behind the person.
STEP 4
Now you want to select a soft round brush with a nice light blue color (about 9 pixels in size, but you can use ANY size and color you'd like, the bigger the number = the thicker the swirly energy line will be).
STEP 5
Make a new layer (in the Layers tab) and name it "energy lines".
Go back to the Paths tab and select stroke path, right click on the path and choose Stroke Path... and choose Brush and activate Simulate Pressure.
Now right click on the Path again, choose Make Selection... set the feather to zero, click OK. Then press CTL+D to deselect. This simply finalizes the stroke path and converts it into a paint line with tapered edges.
STEP 6
Zoom in close and start to erase the areas that would be swirling behind the body parts. Use the Spacebar to move around the canvas as you shift over and keep erasing the areas you want remove.
Something like this:
STEP 7
Right click on the "energy lines" layer, and choose Blending Options and use the settings below.
The results will look something like this:
STEP 8
Duplicate the energy lines layer. Set this layer to Overlay. On this layer, click on the eye next to Inner Glow to deactivate it.
Then double click on the Outer Glow in the layer you just made, and change the values to this.
STEP 9
Download this brush set: blood/ink brushes.
Install the brushes, and choose the Eraser tool and pick a really splattery looking brush (I like the 368 brush towards the bottom of the list). Now select your FIRST energy lines layer (NOT the duplicate you made on top), and start to dab the eraser here and there over top of your energy lines, do NOT click and drag, just do one click at a time to break up the swirly lines, do it as much as you like.
STEP 10
Now for the final touch, adding in some random streaks and dust particles.
Take the Clone tool, and with the same splatter brush, hold down the ALT key and click on the smaller/thinner parts of your swirly lines. Then let go of the ALT key and click on top of another part of your swirly lines. Repeat this process, it may take a bit of practice, but by doing this you can add some of that added partial/broken up swirls in random spots. If you're not happy with some of these cloned energy lines, simply pick the Eraser tool and start removing the bits you don't like.
Another option you can try, is to Brush in some random tiny bits of magic dust:
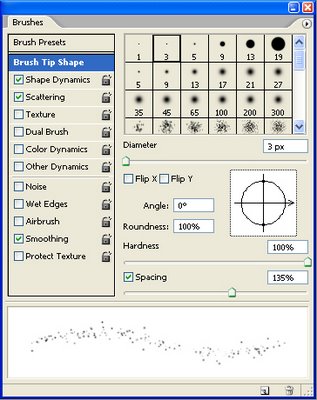
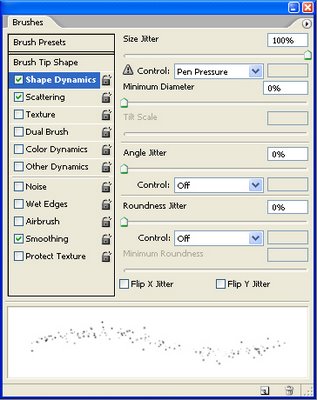
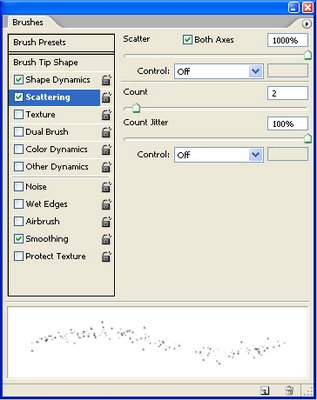
Creating Light Dust Particles Brush
Step 1: Select a small fuzzy brush, press F5 and use these Brush settings


Step 2:Draw some white particles any where you'd like.

Nice and simple. Play around with the size and opacity of the brush too.
BAM! There you have it, keep on going, the possibilities are endless.
Here's just a few variations with the same technique that some of my students have made recently:
Hope you found this helpful, we've covered a few basic functions used in Photoshop all the time to achieve special effects using powerful tools like Custom Brushes, Blending Options and the Path & Stroke technique.
Have fun.

No comments:
Post a Comment