June 30, 2012
Photoshop Tutorial: Selective & Replacement Colors
In this tutorial, I'll show you how to convert your photograph to a black and white image and then selectively keeping certain parts of it colorized, in addition, we'll do a bit of optional color modifications.
First of all, find a photo, from the internet (or one of your own).
Open it in Photoshop and make sure you have your Adjustments and Layers tabs visible and handy.
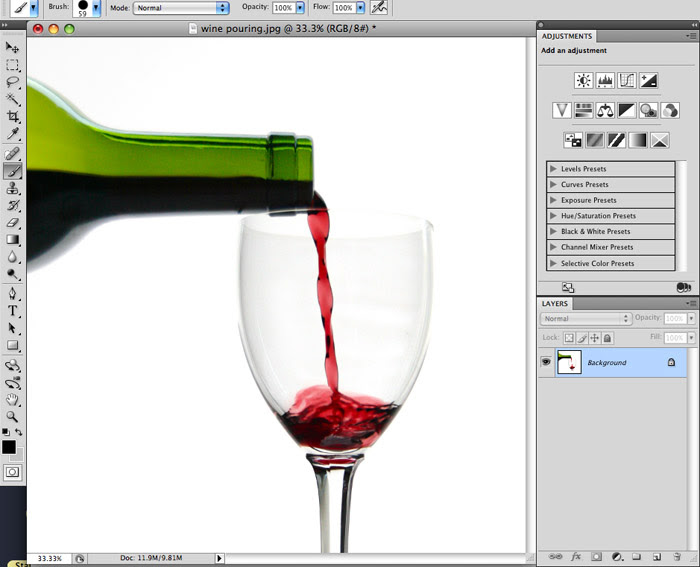
Now duplicate your main layer by dragging it onto to the paper icon.
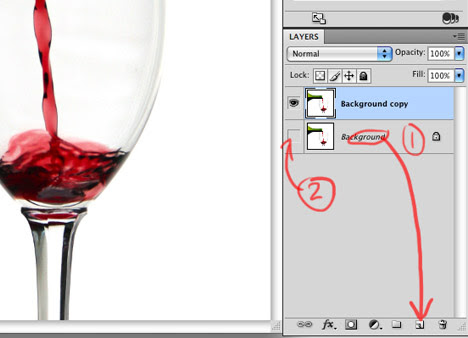
Then make the bottom layer invisible by click on the 'eye' icon.
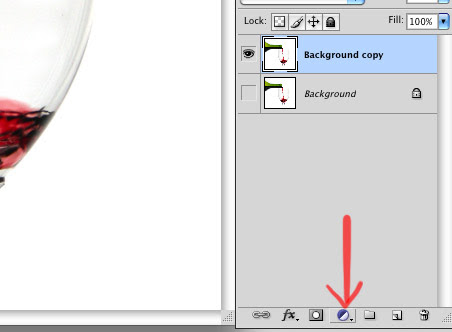
Then click on the Adjustment Layer button.
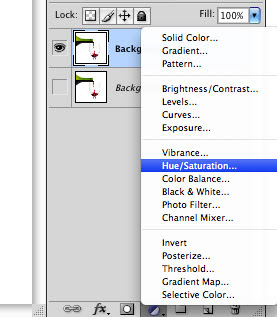
Choose 'Hue/Saturation'.
You'll notice you have a new weird looking layer and your Adjustments panel has changed.
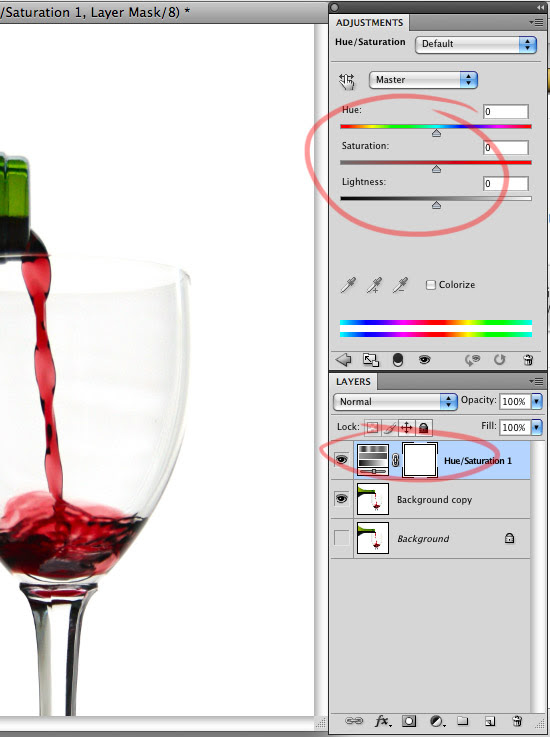
Now comes the fun stuff.
- Drag back the Saturation level to turn your photo into a black & white image.
- Choose black for your foreground color.
- Choose the Brush tool.
- Make sure you have the built-in Mask window selected.
- Make sure you have a hard edge brush, remember; you can
change the size with the bracket keys [ ] at any time.
- Start painting in the areas you want to have the colors come through.
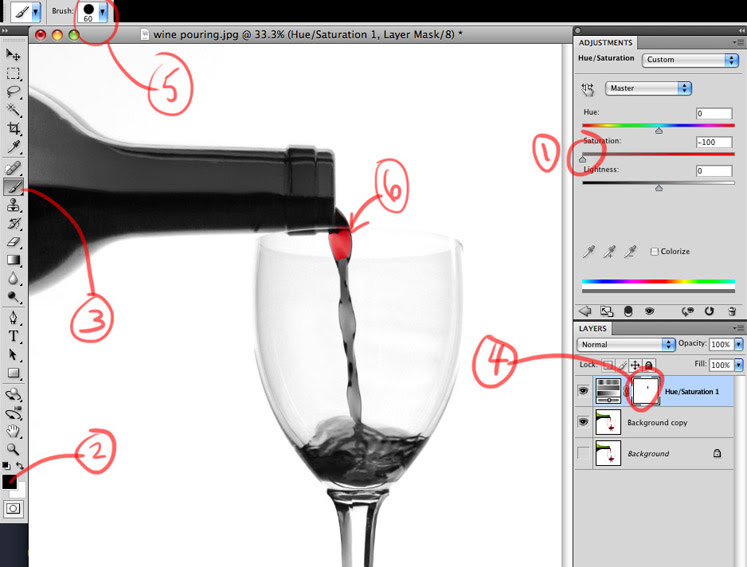
Paint it whatever parts you want, once you're done, that's it!
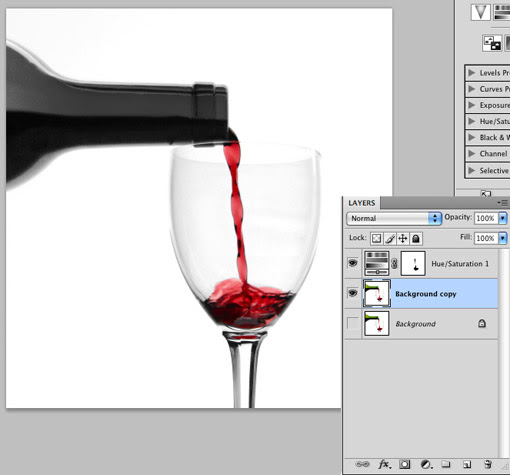
As a little bonus...
Simply select your 'copy' layer.
Go to Image > Adjustments > Hue/Saturation.
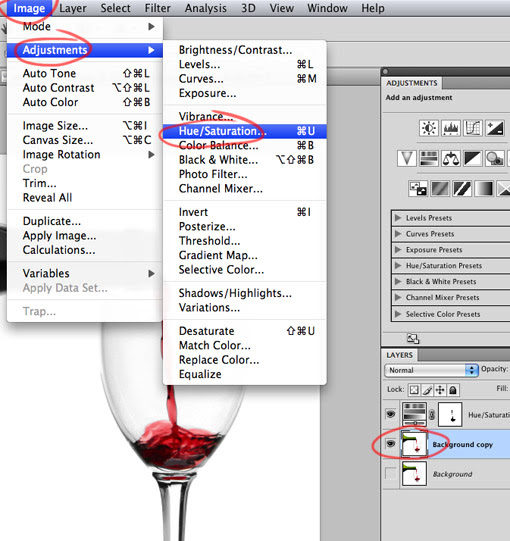
Click on the Colorize switch.
Play around with the two top levels until you get the color you want.
Click OK, and you've successfully isolated and altered color to the
black and white image.
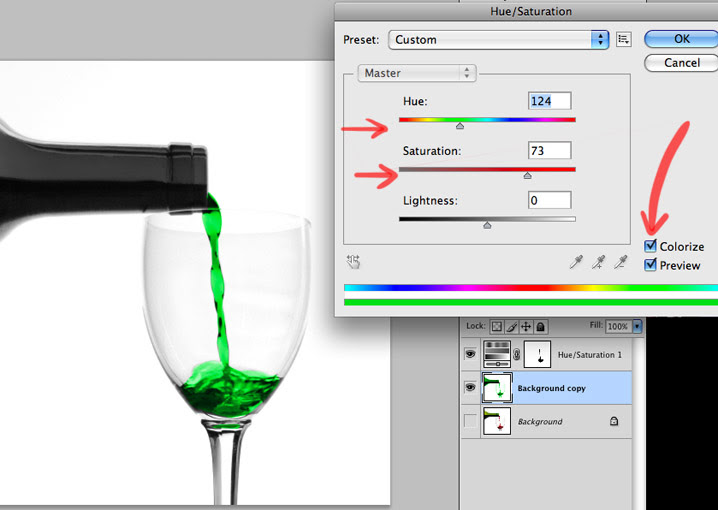

More samples:


Another method...
This time, we'll manipulate this photo to change the tint of a certain area of the image.
You can use the image below (right click on it to save it to your Desktop), or use one of your own photos or find one from the internet.
Open the image that you will use for the change of color.

Take a soft brush and adjust the diameter according to the size of your image.
The larger the image resolution the bigger the brush you need to make.
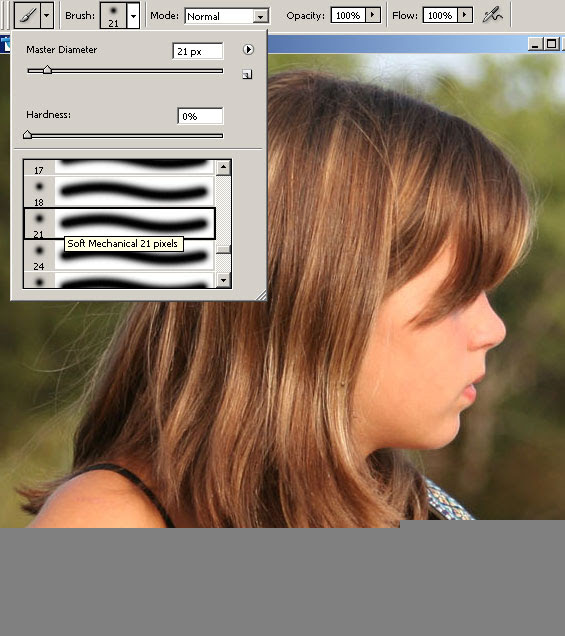
Press the "Q" key to enter in quick mask mode. Mark all the hair area, if you have problems and you go in some wrong areas, just use the eraser to correct. Adjust Brush size with the [ ] keys.
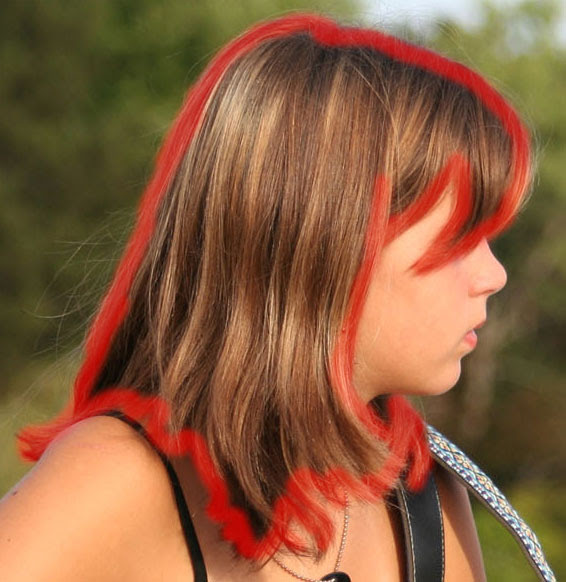

Once you're done - Press again "Q" to leave the quick mask mode.
Now we have a selection around the hair, but we need is the selection in the hair, so go up to the menu to invert the selection: Select > Inverse.

Now it is necessary to dye the area of the selection. To do this, make a New Fill Layer: Layer > New Fill Layer > Solid Color. The basic properties of the new fill layer will appear - change the mode to Soft Light. Click Ok.
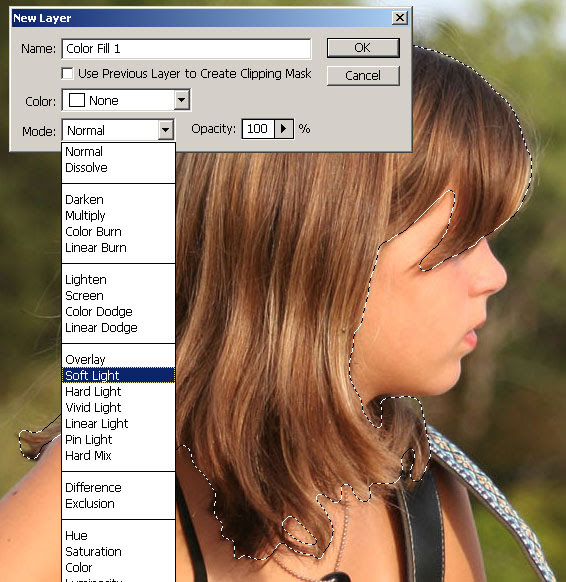
Then use the color picker to select the hair color. Try a few different kinds to see which one you like best.
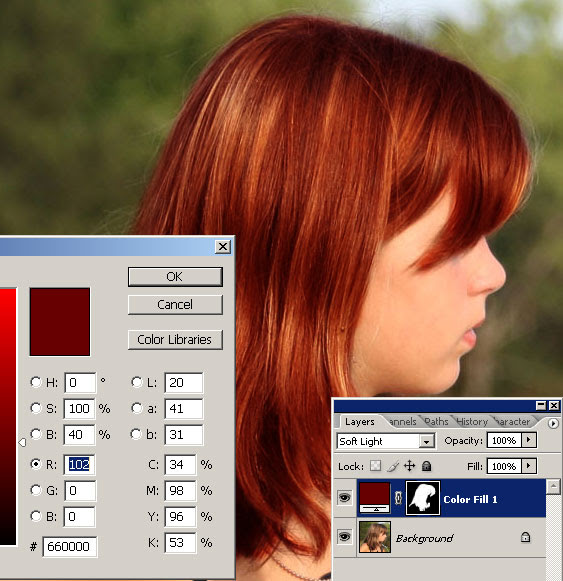
Cha-Bang! You're Done!
Here's some finished samples:


First of all, find a photo, from the internet (or one of your own).
Open it in Photoshop and make sure you have your Adjustments and Layers tabs visible and handy.
Now duplicate your main layer by dragging it onto to the paper icon.
Then make the bottom layer invisible by click on the 'eye' icon.
Then click on the Adjustment Layer button.
Choose 'Hue/Saturation'.
You'll notice you have a new weird looking layer and your Adjustments panel has changed.
Now comes the fun stuff.
- Drag back the Saturation level to turn your photo into a black & white image.
- Choose black for your foreground color.
- Choose the Brush tool.
- Make sure you have the built-in Mask window selected.
- Make sure you have a hard edge brush, remember; you can
change the size with the bracket keys [ ] at any time.
- Start painting in the areas you want to have the colors come through.
Paint it whatever parts you want, once you're done, that's it!
As a little bonus...
Simply select your 'copy' layer.
Go to Image > Adjustments > Hue/Saturation.
Click on the Colorize switch.
Play around with the two top levels until you get the color you want.
Click OK, and you've successfully isolated and altered color to the
black and white image.
More samples:
Another method...
This time, we'll manipulate this photo to change the tint of a certain area of the image.
You can use the image below (right click on it to save it to your Desktop), or use one of your own photos or find one from the internet.
Open the image that you will use for the change of color.
Take a soft brush and adjust the diameter according to the size of your image.
The larger the image resolution the bigger the brush you need to make.
Press the "Q" key to enter in quick mask mode. Mark all the hair area, if you have problems and you go in some wrong areas, just use the eraser to correct. Adjust Brush size with the [ ] keys.
Once you're done - Press again "Q" to leave the quick mask mode.
Now we have a selection around the hair, but we need is the selection in the hair, so go up to the menu to invert the selection: Select > Inverse.
Now it is necessary to dye the area of the selection. To do this, make a New Fill Layer: Layer > New Fill Layer > Solid Color. The basic properties of the new fill layer will appear - change the mode to Soft Light. Click Ok.
Then use the color picker to select the hair color. Try a few different kinds to see which one you like best.
Cha-Bang! You're Done!
Here's some finished samples:
Labels:
Tutorial
June 29, 2012
"Fable" by Daniel Sousa
2005, 7 minutes, 35mm
Sound Design by Dan Golden
In this cyclical fairy tale, a man and a woman are cursed to be forever apart. We never see them inhabit the same space but yet we feel that there's a connection between them. One common element is that they both have the power to transform into animals. But when they do they are compelled to hunt down and destroy the other. They become blind to their passions and are overwhelmed by their instincts.
Technique: Most of the rough animation was prepared in Flash along with the corresponding color fill layers. The drawings were then printed, traced, and cleaned up on paper to achieve a more organic quality. They were then re-scanned and composited in After Effects. Some of the drawings were etched on acetate and rubbed with ink. The backgrounds were a combination of paintings, collages, and photos. The animation was rendered in HD and transfered to 35mm film.
Winter Fox
Through falling snow, a lost young cub searches for home. Short film by Ari and Jason. Music by Simon Westlake. Sound by Sean Lahiff. Traditional animation created digitally in Adobe Photoshop.
June 28, 2012
Meet the Pyro
From Animation With a Moustache blog:
We are now be able to use Valve’s realtime VFX, lighting, animation engine to create our own realtime shortfilms... for free?!?!?!??!
On top of that, we can already imagine that animation, props, VFX creators could sell the fruits of their labour on the Valve marketplace or Steam, for everyone to enjoy. Got some crazy walk/run cycles? Sell them!
Those guys are definitely thinking outside the box and created a really fresh ecosystem and business model. I look forward to hearing more about it and seeing how the wider audience will react to it.
Here's some tutorials:
Sourcefilmmaker.com
June 27, 2012
Animation Demo Reel Advice
From the Animation Podcast website:
by Clay Kaytis
Four things that make a reel work, in order of importance:
Believable performance: Not necessarily “realistic” but believable for the style of animation and situation. This is the part that is hardest to teach. Do your characters show that they are thinking, making decisions, judgments, choices on their own. Do the expression, body posture and dialog shapes accurately reflect what is being said (or what isn’t being said)? Over acting, bad acting, unbelievable acting, and acting that does not fit the situation – those are the the biggest turn offs.
Convincing physics: Do you know how to move characters? Do they have weight? Will I believe they exist in a reality that has gravity? Do they feel like they are built of flesh and bone and not just filled with empty space? Are movements motivated by internal forces – both mental and physical?
Entertainment: Do you have original ideas and ways of solving problems that aren’t typical? Show us how you think that’s different from the crowd. Do you pass over the obvious and make choices that are surprising AND appropriate for the situation?
Polish: This is the bonus round. All of the above are most important but if you can do them along with great polish – spacing, arcs, timing, slow-ins/outs, no pops or wonkiness, obvious care in the details – then your work will stand above the rest.
You may look at your body of work and think that you’re missing some of these things. Well, what is stopping you? You have the tools to animate. You can carve out some time. Do it and animate something new that gives us all of these things and your chances of getting the position you want will greatly improve!
*Of course, this is my own opinion and I am not attempting to represent Walt Disney Animation Studios. With that said, I have worked there forever and I’ve seen thousands of reels and hired scores of people.
by Clay Kaytis
June 26, 2012
IT HAS BEGUN: BANANAPOCALYPSE
Here's the promo/intro for the new YouTube Network YOMYOMF, based on the Asian American pop culture blog, "You Offend Me, You Offend My Family". Programming will include both scripted and reality series, similar to College Humor and Funny Or Die.
June 25, 2012
June 24, 2012
"Un petit plat pour l'homme" by Corentin Charron
Neil Amstrong's "That's one small step for man..." could be translated "Un petit pas pour l'homme" and the title of the film is "Un petit plat pour l'homme", this little word play is the film's title translated as "One small dish for man".
Moonrise Kingdom - Animated Book Supplement
Here's a Moonrise Kingdom companion piece in which Balaban introduces animated sequences depicting fictional kids' books from the film, as read by young co-star Kara Hayward. LeVar Burton should definitely feel threatened.
Adrian Tomine Illustration:
Adrian Tomine Illustration:
June 23, 2012
June 22, 2012
"TUVWX" by Nick Bakker
"A short a film I made a few years ago, from a recording of my pal's four year old daughter singing." - Nick Bakker
June 21, 2012
Classical Animation Combines With Innovative Gameplay In "The Act"
Today I was introduced to a fantastic little iPhone game called "The Act" and I was blown away by its ingenuity, simplicity, and exquisite animation!
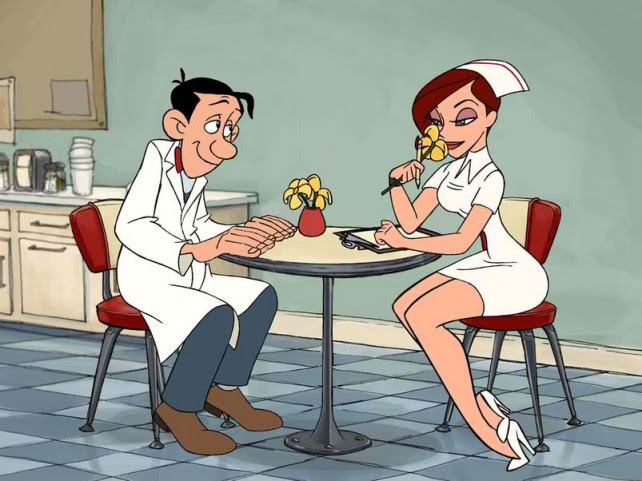
The Act is billed as an “interactive comedy.” The game’s interactivity and artistic style harks back to the comedic cartoons of yore, particularly Don Bluth’s “Dragon’s Lair.” It's so much fun to play and a delight to watch the performance that the animated characters put on.
The Act’s old-school feel is decidedly part of its charm. And while its graphics may incite a bout of nostalgia among older players and ALL classically-trained animators like myself, its gameplay is tailor-made for the here and now.
In The Act, you’re tasked to keep up Edgar’s act by controlling his actions with your iDevice’s touchscreen. A lovable loser, Edgar must try to hang on to his job, take care of his dimwitted brother, and woo the girl of his dreams all at the same time.
For the most part, the key is to slide your finger on the screen to the left or right until you strike a proper balance between two possible scenarios. In one scene, for example, you must be able to strike up a relationship with Edgar’s love interest without being obnoxious.
This game is definitely one of the most interesting iOS games I’ve come across in a long while. It’s available at the App Store now, it was published by the company Chillingo.
Make sure to check it out, it's only $3.
More info here.
The Art of Abraham Lincoln: Vampire Hunter
Preview via Comics Alliance

Based on the novel by Seth Graeme-Smith, Abraham Lincoln: Vampire Hunter is one of the summer's more curious releases, imagining an amusingly outrageous scenario whereby the legendary American president was actually a skilled slayer of the undead. The film is produced by Tim Burton and directed by Timur Bekmambetov, both of whom have obvious connections to the comic book world via their adaptations of the Batman comics and Wanted, respectively. In support of Abraham Lincoln, Bekmambetov has teamed with Aspen Comics to release a book quite unlike anything we can remember seeing.
While it's typical for a film's storyboards -- the simple, comic-book-style drawings that map out a movie's shots -- to be reproduced along with script pages in those handsome "Art of the Movie" books, the Abraham Lincoln: Vampire Hunter team have gone the extra step to reconfigure the storyboard images by artist Indar Dzhendubaev into an actual comic book. It's a pretty cool idea, and we've got loads of images to demonstrate the results.
Bekmambetov considers the comic, officially called Director's Cut: The Art of Abraham Lincoln: Vampire Hunter, to be his director's cut of the film. Interestingly, the narrative is constructed in such a way that the graphic novel retells the movie's story from the point of view of its villain, played by Rufus Sewell in the film.
Director's Cut: The Art of Abraham Lincoln: Vampire Hunter is on sale now in bookstores and will be available in comics shops soon.
Subscribe to:
Posts (Atom)


